Showing posts with label Vinyl. Show all posts

Wednesday, August 17, 2016

Memory Jar Design #2 {Upcycled/Recycled}

Another,Memory Jar. I created quite a few designs of my own. I've made quite a few of these "Jars" I have a few listed in my Etsy Shop

Here's another Design


This one is one of my favorites. I used "lace" ribbon around the lid and added some "pearls" to "bling" it out. Around the top and bottom I cut a paper doily and glued it on very carefully. It took me a long time to do because again of my disability with my arm/hand makes things a bit difficult. I added some ribbon and a "crotchet flower" from CTMH. Cut the vinyl "jumbled words and Hearts to fill in the empty places. I added matching "pearls" to again add some pretty bling. I spray painted a "pearlised" clear coat over the whole thing to help keep the paper doily parts on and protect it.

Until Next time...
Happy Crafting!
TTFN The Scrapoholic aka Jill

Wednesday, August 10, 2016

Memory Jar {upcycled/recycled} - Pinterest Inspired

Yes, again, a Pinterest Inspired Project.
Memory Jar or Happy Jar. The ones I saw on Pinterest were quite simple. I just don't do much things simple. I created quite a few designs of my own. I've made quite a few of these "Jars" I have a few listed in my Etsy Shop and Hope to get more listed this next month. 
This one is Purple and blinged. I originally created this one for my Best Friend. But I created another in Purple too and a different design. I'll post it later.

I've always saved containers, bottles and jars since I was a kid for crafting. I LOVE creating things from them. I always say I recycled before it was a thing or it was cool. My husband eats alot of mayonaise, not by itself, thats just gross. But he uses it on alot of foods. I have quite a few of these saved.He tries to throw them in the recycle bin without me knowing but I find them or my kids pull them out for me. He says I have enough, but I say no I don't!

Here is one of my "Memory Jars":
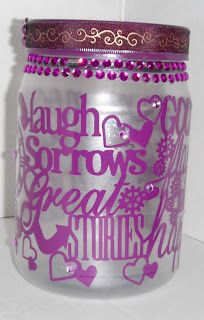
 I spray paint the cover to match the colors of the vinyl. Sometimes, I add ribbon around the cover too. Sometimes I add some embellishments. This one I added some Gems. I created a "jumbled" words and "icons" to go along and fill in the blank spaces in between the words cut file to go around this particular size jar.


The hardest part of theses memory jars for me is getting the vinyl on straight. I've lost alot of my grip in my right hand due to the ulnar nerve damage I have and having CRPS/RSD. With Jars being round they roll and that makes it a bit difficult to. I have gotten better at it as the more I do. But you can see a lil "crookedness" in some of the pictures.

Until Next time...
Happy Crafting!
TTFN The Scrapoholic aka Jill

Tuesday, August 9, 2016

Pinterest Inspired - Chalkboard Vinyl DIY

Not sure how many of you are addicted to Pinterest as me. I spend way too much time on there. Most of the time I'm on there, I'm bedridden with pain and it helps distract me. Not that I don't get on there when I'm not in so much pain, but usually when I'm not in pain I'm creating cut files or trying to scrapbook or craft. Pinterest, as much as it gives me great joy it brings me sadness cause there are so many things I want to do but am physically impossible for me to do anymore.


Anyways, I saw several posts about spray painting vinyl to get colors you want. One of the post was about chalk board vinyl. Sadly none of the posts lead me to any tutorials they were just jpegs dead ends. I know I've pinned pins that are the deadend jpegs and lead nowhere , but I do it for a reminder of something I want to try and I think I can figure it out somehow. So, I decided to just wing it and see what would happen. I have a bunch of cabinet door chalkboards work in progress. I have plenty of chalkboard paint but didn't have any spray paint. Off to the store I went and got a few cans. I knew I couldn't use the "paint brush" chalkboard paint on vinyl. I took my vinyl "wall pops" that i purchased years ago at Lowes when it when on sale. I've used most of it up except for the orange, which i still have quite a bit of that color. I used those ones to try. 

I did it 2 ways. One I just spray painted it. The other I sanded it just lightly with a very fine sand paper. Both ways took several coats. 

The first layer I did in a gray paint and it was very light and doesn't really cover it all. To give it as base coat/"primer"

The second coat is just a lil heavier and covers it all.

 The third layer was a light coverage with the Chalkboard Paint.

 and the fourth was another layer and I did another layer and it was perfect.

  I have to say both worked. I haven't seen any difference in either way. I did 5 12x12 vinyl and I still had a lil left of the chalkboard paint from one can. I want to say the can of chalkboard Paint was $4.98

Have you tried it?

Until Next Time...
Happy Crafting!
TTFN The Scrapoholic aka Jill

Wednesday, March 23, 2016

Craft Project: Another Vinyl Project

Yes, I'm a vinyl addict! I used to love painting and making craft projects, but after my injury I haven't been able to paint. Vinyl has replaced my desire to paint to some degree, there still is alot vinyl can't do that the paintbrush can.

My best friend and I became friends thru our kids. Both our eldest daughters ecame friends and both our only boys became best friends and my other daughter and her other two daughters became friends. With our kids hanging out with each other, we naturally became friends. We both moved from Oregon back in 2004, and for all of us it was hard but choices had to be made. I moved back with my family in 2011 and she moved back last year.  Sadly, she is moving away again, and I'm very sad. But we will stay in touch and have already made plans to visit each other.

I made her these altered, upcycled candle jars.


You can make your own Mugs or other projects like this one too! Simply go to my Etsy Shop and purchase one of the several Designs I have created. Miles are Measured by the Heart Design HERE or Family/Friends Forever Design HERE. "Quotes" have different fonts, several different "Dashed Lines and Hearts" and each includes, All 50 US States, Outlined, and Solid shape too.

Until Next Time...
Happy Crafting!
TTFN The Scrapoholic

Saturday, March 19, 2016

Craft Project: Best Friend Across the Miles Vinyl Mug

Another Project, my daughter & I worked on together for her Best Friend. I mostly did the work and she picked the designs and colors, which is important too!

We made matching Mugs, one for her Friend and One for her. Again, I used permanent vinyl from expressionsvinyl.com  I have used both brands of permanent and removable vinyl from their site, Oracle brand and their brand and find them to be equal in quality.


With this project Transfer Tape is A MUST!!


She wanted the Quote from the canvas project to go along the bottom. I had to shorten it because even at the shortened version it was hard to get it to fit. After doing these I think I may have done the quote positioning slightly different. Like part on top and part on bottom, so it wouldn't need to be cut so small. 


We added in their Names at the top of the insie of the mugs


and a small message at the bottom "Miss You"


Both cups have been used and run thru dishwashers several times and 
have held up to the use and washings!


You can make your own Mugs or other projects like this one too! Simply go to my Etsy Shop and purchase one of the several Designs I have created. There are several "Designs" with different "Quotes" in of course, different fonts, several different "Dashed Lines and Hearts" and each includes, All 50 US States, Outlined, which will Also give you Solid shape too.

Until Next Time...
Happy Crafting!
TTFN The Scrapoholic

Saturday, March 12, 2016

Canvas Vinyl Quote Craft Project

My daughter chose the quote for her Best Friend.  She was putting together a Birthday gift Package to send to her. I have a couple other projects, we made that I'll be sharing. We use to live in So. Cal but moved back to Oregon in 2011.  She misses her friend alot but I have to say, I am surprised at how great they've stayed in touch and remained friends. I've lost touch with alot of friends over the years after moving and I'm an adult. I find today the youth of America friendships don't mean what they use to. My kids and some of my friends kids have roken friendships that never mend over the silliest things. 

Anyways, I used an 8x8 Canvas, bought it years ago at Goodwill for 50 cents! It was painted a weird "bronze" color.  My daughter painted it a metallic purple. She used Folk Art Metallic Purple paint. I created the quote in Make the Cut, I'm sorry, I don't remember what font I used. I will have the Quote available in my Etsy shop somewhat soon, I am working on several versions and in a few different fonts and mixed fonts too. I cut it from Oracle (651) Permanent Metallic Silver Vinyl, that I purchased at Expressionsvinyl.com  It being an intricut and small cut, it was a bit difficult getting all apart and put on the canvas. Even with the transfer tape, not sure if its because it was my first time using permanent metallic vinyl or because of the issues with my right arm and hand. I've used the same vinyl since and not had any issues even with small and intricut cuts. I did run my heat gun over the canvas for a bit and just "rubbed" in the vinyl to get in the "textured" surface. I then sprayed a clear Modge Podge over the Canvas to "seal" it.

Its pretty simple canvas project but the girl LOVED it! 


Until Next Time...
Happy Crafting!
TTFN The Scrapoholic aka Jill

Friday, February 5, 2016

More DIY Vinyl Denver Broncos T-shirts

I know most of you are probably bored with my Bronco T-shirts and in General Football. I just LOVE Football and LOVE My Broncos! As a fanatic Fan I've always wanted my own shirts and I have 3 Denver "Jerseys" 2 Elway and 1 Peyton which are awesome but someties you just want that comfy tshirt! I have to say I've been a lil timid toward the whole cutting my own Iron-on vinyl but boy oh boy, I got thru that first one and I've become addicted!! Its SO EASY! You MUST try it at least once!  Its so fun and like I said easy.

Here are my Last few TShirts:


I have a File for Sale in my Etsy Shop which has 5 different "Lips" and 5 different "Fonts" You can Purchase it HERE  You add in your Team Name, if Your not a Broncos Fan, actually, the File has NO Team Names.

Of Coarse, I have to have the Traditional Denver D! I made 2 of these. Like the "Superman" T-shirt,I did the Same here, using the "negative cuts" from the Original Cut. I hate wasting! I want to get every pennies worth especially since the penny isn't worth what it use to be worth! Not that the price of Iron-On vinyl is expensive.


T-Shirt made with the "Negative" Cuts and just a tad lil more orange for Miles' Mane & Tale


I wanted to add "They Will CRUSH You" on the Back of each but I ran out of Orange Vinyl an it just doesn't look right in all Blue, at least for me.


Last but Not least, My Peyton Jersey!


Until Next Time...
Try an Iron-On Vinyl Project!
TTFN The Scrapoholic


Thursday, February 4, 2016

Denver Broncos DIY Vinyl T- Shirts - Three Amigos

I've made 7 T-shirts using Iron-On Vinyl to make my awesome Denver Broncos T-Shirts. I purchased my vinyl from Expressionsof Vinyl, I'm not affiliated, nor do I get paid to mention them I just use them and have had Great experiences with them. Below is my Three Amigos Shirt! I'm wearing one every day to support my team this week!


 Grab the Basic Three Amigos File HERE
To Get a more "Detailed" Football Player Go to My Etsy Shop HERE


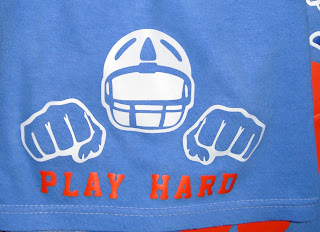
To Grab Play Hard with Helmet and Hands Go to my Etsy Shop HERE

Until Next Time...
Go Broncos!
TTFN The Scrapoholic aka Jill
01 09 10